For this tutorial, I am going to show you how to add an 16×2 LCD display to your Raspberry Pi OpenMediaVault (OMV) Network Attached Storage (NAS)/personal cloud. I am going to assume that you already have a functional Raspberry PI with OMV cloud server installed. If not, there are plenty of tutorials online that show you how to install and configure OMV on your RasPi . Also, a working knowledge of Python will help code the actual LCD, but you can always just use my code.
Things you need:
- Raspberry Pi 3 with OMV configured
- 16×2 LCD
- Breadboard (good for testing purposes before soldering)
- Wires
- Putty to SSH into OMV (Windows Only)
- Some basic Python knowledge
Wiring the LCD
Wiring the 16×2 LCD is fairly simple. We will be using the GPIO pins located on the Pi to connect the LCD display. The LCD can be connected using 4-bit mode or 8-bit mode. For simplicity sake, we are going to be connecting it in 4-bit mode.
The main difference between the two wiring modes is the speed, and the amount of wiring/GPIO pins used. Each byte is made up of 8 bits and transferred via the GPIO pins. In 8 bit mode, a byte is sent all at once, whereas in 4-bit mode a byte is split into half and then sent, however the difference in speed is barely noticeable, therefore a 4-bit connection makes more sense.
I will also be grounding the “contrast” of the LCD, which will make it really bright, but feel free to add a resistor or a potentiometer to limit the current. Here is a picture of a generic 16×2 LCD (most manufacturers use the same pinout):

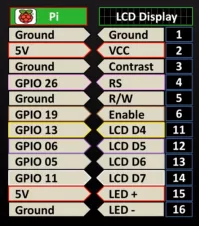
Here is a diagram of how the RasPi pins connect to the corresponding LCD pins:
First, connect your 16×2 LCD to your RasPi cloud similar to the following diagram I created using Fritzing:

If everything is connected properly, the LCD should light up but the display should be blank.
Configure OpenMediaVault
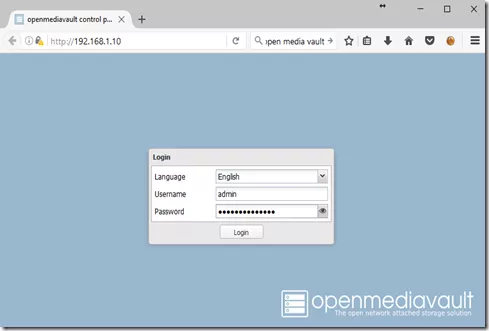
Next, we need to access the OMV web control panel to enable SSH, and add user permissions to all the user to make changes via SSH. To access the web control panel, simply type in the IP address of the Raspberry Pi into your browser and login.
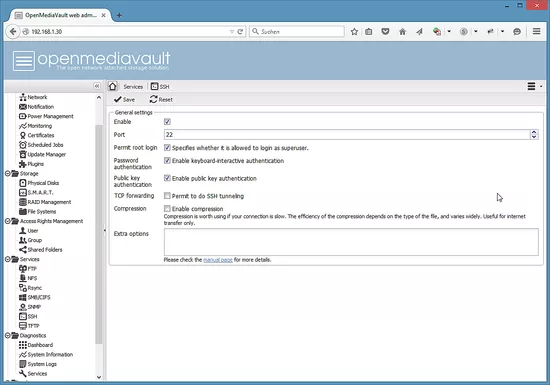
To enable SSH connections to your RasPi OMV server select SSH on the left pane, and enable it in the right pane:
I am going to assume that you already have a user setup because your cloud is in working state. However, before we can SSH we need to give the user privileges. In OMV web-client, on the left pane click “User” and select the user in the right pane then click “Edit”. Next, click the “Groups” tab in the “Edit User” popup window and add the user to the following Groups: USER, SSH, SUDO. This will grant the user privileges to Secure Shell (SSH) into the OMV server as well as run Super User commands.
You should now be able to Secure Shell (SSH) into your OMV Pi Cloud. SSH will allow you to manipulate system (root) files of the OMV linux distro (debian). Therefore, this will allow us to create a python script, which will update the display and show the amount of space, time, IP address, temperature and whatever else you can think of that you wish to display. Also, to keep the display updated, we will create a cron job.
Secure Shell – SSH
To SSH into your Pi cloud server and manipulate the files, open the Linux terminal and type:
ssh [email protected]
Where username is the username you gave SSH & SUDO permissions to in the OMV web client and the IP address is that of your Pi.
Here is an example of the output when running on Linux:
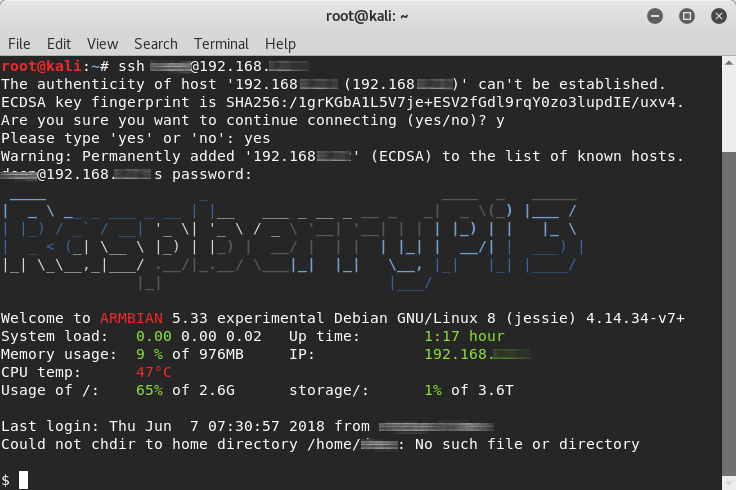
Note: It is useful to assign a static IP address to your Pi
After connecting, you need to be able to access the root account type:
sudo su
This should prompt you for your password again, so go ahead and enter it, and now your should be able to access the root directory.
Troubleshooting
If you get an error stating that
Authentication token is no longer valid; new one required.
It just means that you need to change the root user password. To double check, you can run the sudo chage -l root, which should tell you whether your password is expired. If it is expired, it can be updated using sudo passwd root.
Python Configuration
Once in the OMV root prompt, enter the following to see what version of Python is installed:
python --version
I used version 2.7 — which came installed by default on OMV, so you should also have the same version if you are running the latest OMV version.
You can also check which version of PIP you have installed by running the following:
pip --version
PIP is a package management system used to install and manage software packages written in Python. –Wikipedia
We will need to use PIP to install the RPLCD Python library. This will allow us to print characters to the LCD screen. To install RPLCD, run the following once you SSH into your RasPi:
pip install RPLCD
Troubleshooting
If you get an error with pip on OMV, try side-loading pip by running easy_install pip. This should resolve any pip related errors.
Python Script to Update LCD
Next, we need to create a Python script to manipulate the characters on the LCD. The python script I created, displays the space used (in percentage), the time and temperature. Feel free to use/edit/change the code as desired. Create a python file:
touch updateLCD.py
Now, open the updateLCD.py file using nano or vi text editor:
nano updateLCD.py
Type the following code and save the file:
#!/usr/bin/python

import os
from time import strftime
from RPLCD.gpio import CharLCD
from RPi import GPIO

def getSize():
df = os.popen("df /dev/sda1") #run the df command and save output to df
i=0
while True: #read df output and return list
i=i+1
line = df.readline()
if i==2:
return(line.split() [4:6]) #return items 4 to 6

tFile = open('/sys/class/thermal/thermal_zone0/temp') #open temperature file
temp = int(float(tFile.read()))
tempC = str(temp/1000) #convert to readable temp

#configure LCD pins
lcd = CharLCD(cols=16, rows=2, pin_rs=26, pin_e=19, pins_data=[13, 6, 5, 11], numbering_mode=GPIO.BCM)

sz=getSize() #getSize function to SZ list

lcd.clear
lcd.write_string(u'Time: ' + strftime("%H:%M")) #print time
lcd.cursor_pos = (1,0) #change cursor row to 2nd line
lcd.write_string(u'Used:' + sz[0]) #print percentage used - saved in index 0 of sz
lcd.cursor_pos = (1,9) #change cursor position to 2nd line and column 10
lcd.write_string((tempC) + "c") #print temperature
Finally, run the script we just created by typing the following:
python updateLCD.py
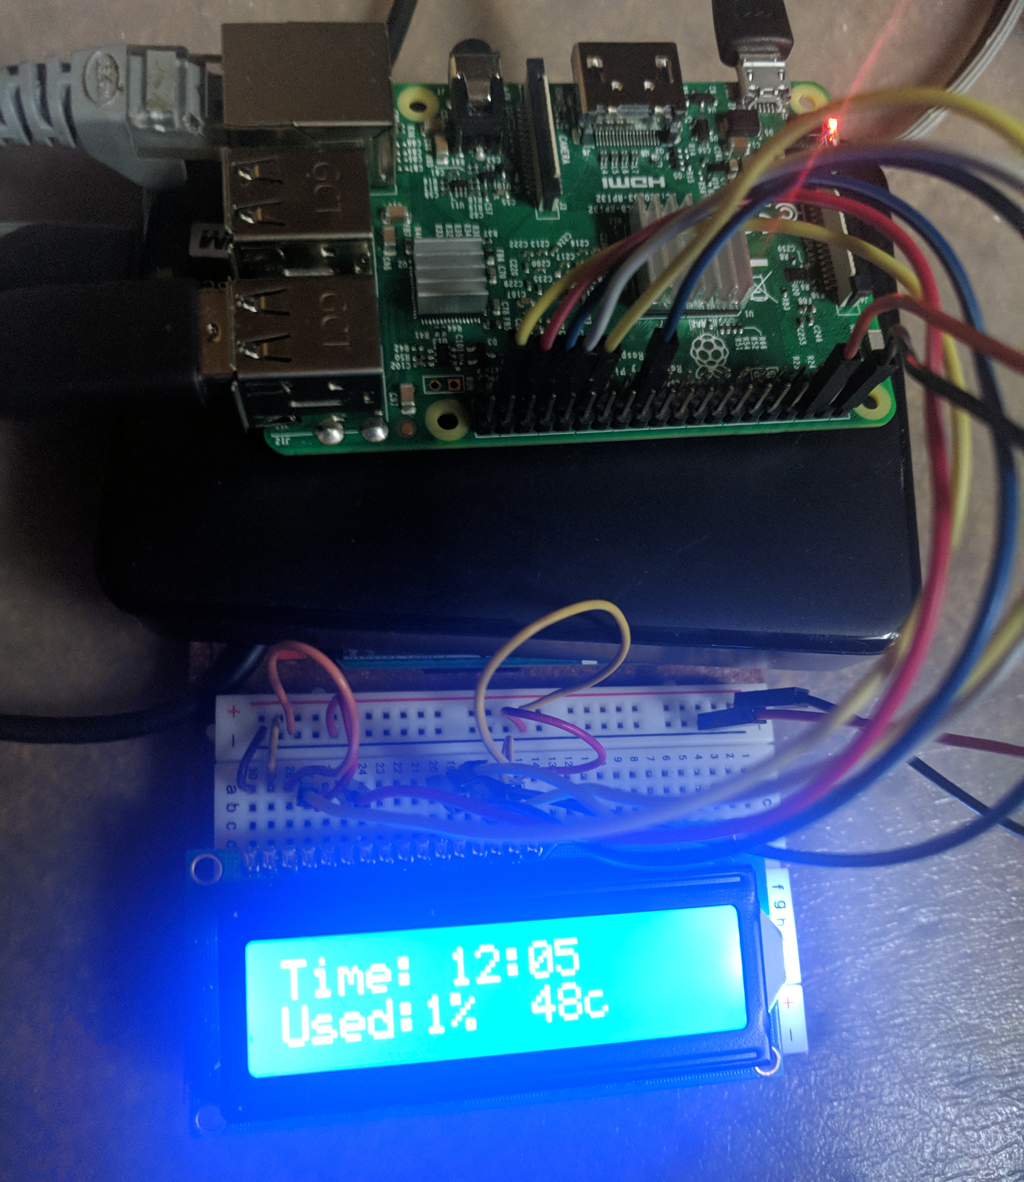
The 16×2 LCD should now display the Time, Percentage Used and the Temperature of the CPU.
Now all we have to do is automate the running of the script by creating a cron job.
Cron Job
A Cron job is how linux users/admins schedule tasks/scripts to run minutely, hourly, weekly, etc. It generally helps administrators automate repetitive tasks. Essentially you run the contrab -e utility to edit the contrab file and add a cron job, however we can just use the OMV Web Client to create our cron job.
Fore more on Cron jobs see the wiki.
Before scheduling the job, while still in SSH, copy the updateLCD.py file into the /etc/cron.hourly folder and give it the necessary permissions to execute:
cp /updateLCD.py /etc/cron.hourly/
chmod +x /etc/cron.hourly/updateLCD.py
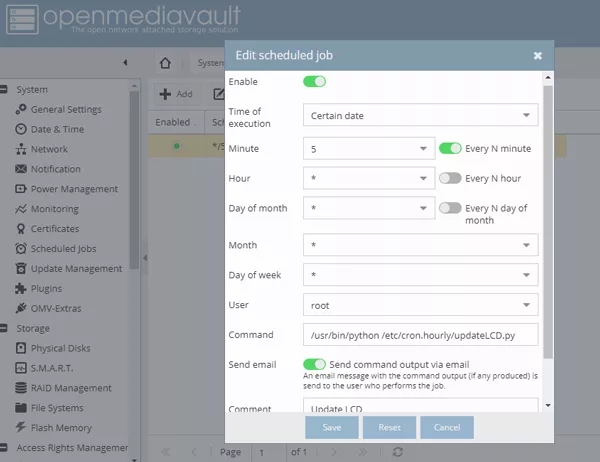
Next log onto your OMV Web Client by opening your browser and directing it to your servers IP and entering your admin user name and password — like we previously did. Then on the left pane select “Schedule Jobs” and then click “Add” on the right window pane. You should now have the following popup:
As you can see above, I scheduled our updateLCD.py script to run every 5 minutes. Make sure you enable the job switch and select “root” as the user. For “Command:” enter /usr/bin/python /etc/cron.hourly/updateLCD.py. This cron job will run the above command, which will execute our python script every 5 minutes. Now save the job and hit “Apply”. Your LCD should automatically update every 5 minutes and display the updated information.
Troubleshooting
You can view your system log if you are experiencing issues with your LCD updating, double check the Log Viewer in OMV web client, or
run the following cmd:
cat /var/log/syslog | grep -i cron
Summary
Adding an LCD to any project can be useful to provide user feedback. If you can run a command and parse the text from it, you can display it on the LCD. You can even create scrolling text and games, however this tutorial was created just to guide you through how to connect a simple 16×2 LCD display to your Raspberry Pi and display some useful information. After some testing, it’s a good idea to solder the LCD and create an enclosure for all the electronics to avoid a fire hazard.


0 Comments